Hey.
thanks for your interest in the open source storage unit(s).
if you have any questions, just ask.
Pete
http://claimid.com/peteski
ps. Previously, you had to find my email address and write to me to get these plans, it was just a little hurdle just to make sure you were interested enough. Over the years, more than 1,000 plans were sent out. This is a copy of the email you would've gotten. The hurdle's been removed - enjoy. 06.09.09
+ + + + + + +
NOTES:
the places that sell high end plywood, will do the cutting for you. milling (cutting) charges are well worth it.
be sure they square the wood, trim all sides, before cutting first and make certain the wood is not warped.
the small red numbers indicate preferred cutting order to start. (this order will insure a better fit.)
the 1" maple europly is sealed and finished on both sides. be sure to sand the edges nicely before assembly. you do have to wax or polyurethane the edges after or before assembly.
SUGGESTION: find the wood first, don't buy it yet. find & buy the door tracks. find & buy the plexi and buy it where they'll cut for you. then go back and buy the wood.
One Sheet Plywood Cutting Suggestions:
#3,
#4
CABINET #3
+ + + + + + +
MAIN SUPPLIES:
- 1" maple europly
$150 fullsheet
- 1/8" plexiglas cut to size:
2x gray 8 9/16" x 17"
2x matte brown 8 9/16" x 17"
2x translucent white 8 9/16" x 24"
$45 total
- Polished Chrome legs 4" square
(found here > http://www.kitchensource.com/table-bases/ha-1212c.htm )
$9 per 4
- 2 sets door tracks for 1/8" doors (72 in.)
$19 per
- prices approx. shipping, tax not included.
- TOOLS:
- hammer
- power drill
- screwdriver
- clamps are helpful
- nail set
- OTHER STUFF:
- light grit sand paper
- wood screws for legs
- 1 1/2" finishing nails
- wood glue
- wood putty stick (color to match)
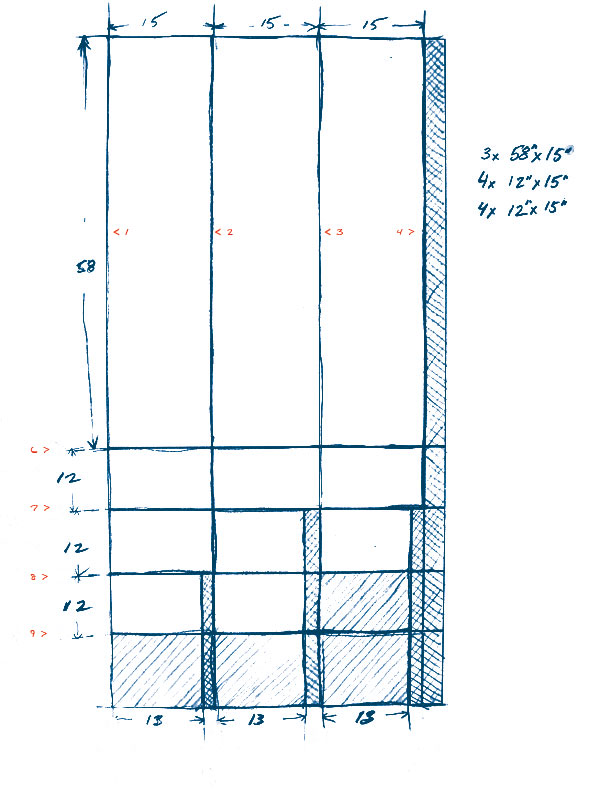
get the wood cut following as per attachment. cabinet3layout.jpg
(they're hand drawn. this will give you woodworking cred at the woodshop save attachments, print separately)
download graphic instructions here: http://x818.com/cabinetnumber3/instructions3.pdf
follow the pictures here: http://x818.com/oss3/
they're pretty self-explainatory. work from the bottom up.
mark where the verticals (group 1) go (on bottom horizontal) .
measurements on the pdf.
set inner verticals back 1 3/4" inches back from from edge of bottom horizontal, 1/4" from back edge.
score finished surfaces with sand paper where ever verticals and horizontal meet. drill pilot holes for nails, glue, nail.
add the bottom door tracks, cut to size, before adding the second (middle horizontal) tier. 3/4" from front edge or flush against inner verticals.
glue the second set of verticals, group 2, in place (score surfaces first) - same places as first set.
add door tracks, again 3/4" from front edge or flush against inner verticals.
add top horizontal. drill pilot holes for nails, glue, nail. use nail set, then wood putty stick.
add legs. 14" from sides, front pair 1 1/2" from front edge, back pair flush against back edge.
CABINET #4
+ + + + + +
MAIN SUPPLIES:
- 1" maple europly
$150 full sheet
- 1/8" plexiglas cut to size:
2x gray 11 9/16" x 12"
2x matte brown 11 9/16" x 12"
2x translucent white 11 9/16" x 22"
$35 total
- Polished Chrome legs 4" square
(found here > http://www.kitchensource.com/table-bases/ha-1212c.htm )
$9 per 4
- 2 sets door tracks for 1/8" doors (48 in.)
$16 per
- prices approx. shipping, tax not included.
Instructions, tools, stuff follow Cabinet 3 instructions.
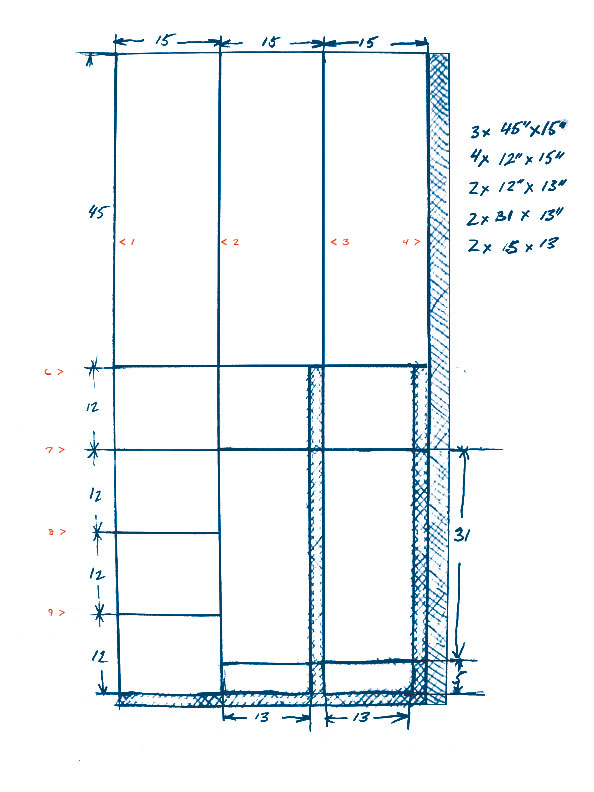
get the wood cut following as per attachment. cabinet4layout.jpg
download graphic instructions here: http://x818.com/cabinetnumber4/instructions4.pdf
follow the pictures here: http://x818.com/oss4/
they're pretty self-explainatory. work for the bottom up.
measurements on the pdf.
* be sure to assemble both bottom at top inner shelves first before doing anything.
legs are added 9" from sides, front pair 1 1/2" from front edge, back pair flush against back edge.
ps. some smart folks ask, "Where's cabinets 1 & 2?" see ReadyMade Magazine Issue #8